


How to Transfer Ownership in Squarespace [2025 Guide]
If, like me, you build Squarespace websites for other people, then one of the most important steps of any project is handing over the ownership of the website.
It’s not just Squarespace designers who need to know how to do this, either. If your email address is associated with a website and you move on from the company, you’ll need to know how to transfer the ownership to another colleague.
While the Squarespace transfer of ownership process may seem overwhelming, it’s actually straightforward once you get the hang of it, and I’ll be walking you through the steps in this guide.
Watch the video
You may also check out the YouTube video below for a more visualized Squarespace transfer ownership process👇

Want a framework for designing the perfect homepage?
Before the transfer, however, there are some prerequisites to fulfill…
Preparing for Ownership Transfer: An 8-Point Checklist
Before you pass the baton to the new owner (or real owner) of your Squarespace website, it’s crucial to ensure that everything is in order for a smooth transition.
Here’s what you need to focus on:
Back-Up: First things first, safeguard your entire website content. While Squarespace doesn’t offer a one-click download feature for your entire site, you can manually back up key components. Save pages, blog posts, images, and any custom CSS or code injections you’ve applied. Tools like HTTrack or a simple ’wget’ command can help you save static copies of your web pages, just in case.
Reviewing Billing Details: The last thing you want during a transfer is a service interruption due to billing issues. Review existing subscriptions and check that no payments are overdue. This is also a good time to print out or save digital copies of your billing history and site renewals for your records.
Verifying Domain Status: If your domain is registered through Squarespace or managed elsewhere, it’s vital to ensure you are not currently transferring the domain to Squarespace for the affected website. Having a pending “Squarespace transfer domain” task before the website transfer period can complicate things, as domain transfers can take up to 15 business days to complete. Verify that the domain is stable before initiating the site transfer.
Reviewing Access Permissions: If you have multiple contributors on your site, it’s wise to review their access levels. You may want to revoke or change permissions before the transfer, especially for those who won’t be part of the website under the new ownership.
Updating Content and Contacts: Go through your website to update or remove personal information. This includes your contact information in the website footer, in your website’s privacy policy, and on any forms or pages.
Final Check: Do a last run-through of your website. Ensure all forms work, pages load correctly, and that no personal data is left that you wouldn’t want to pass on.
Preparing a Handover Document: Create a document for the new site owner that includes important information they’ll need to manage the website. This should include any custom code snippets, a list of third-party services the site uses (like newsletter services, plugins, or analytics tools), and instructions on how to perform common tasks or updates on the site.
Informing Your Users: If your website has a loyal following, it might be a good idea to let them know about the change in ownership. This can be done via a blog post or an email newsletter. Transparency can go a long way in maintaining trust.
Of course, a developer doesn’t need to bother with most of these steps. However, for regular business owners who are passing the baton, it’s important to adhere to the above checklist. You’re not just preparing for a transfer; you’re ensuring that the website continues to run like a well-oiled machine, even after you’ve handed over the control panel to someone else.
Now that you know what you have to do before you initiate an ownership transfer process on Squarespace, let’s walk through the step-by-step process of the actual transfer. You can also reach out to me for assistance on your website if you get stuck.
How to Perform a Squarespace Transfer of Ownership in 4 Simple Steps
Head to Settings > Permissions and here you can see anyone who is listed as both an owner or a contributor for your Squarespace website. How to Perform a Squarespace Transfer of Ownership in 4 Simple Steps
Step 1:
Head to “Settings” >>> “Permissions,” and here you can see anyone who is listed as both an owner or a contributor for your Squarespace website.


Step 2:
Within this section, you’ll see an “Invite Contributor” button. Click this and enter new owner account details such as their name and email address. By toggling the “Administrator” option, you’re creating an owner account, which gives them total admin control of the website.
Note: If you simply want to make them contributors, you can go down the list and toggle on the specific permissions you want to grant them.
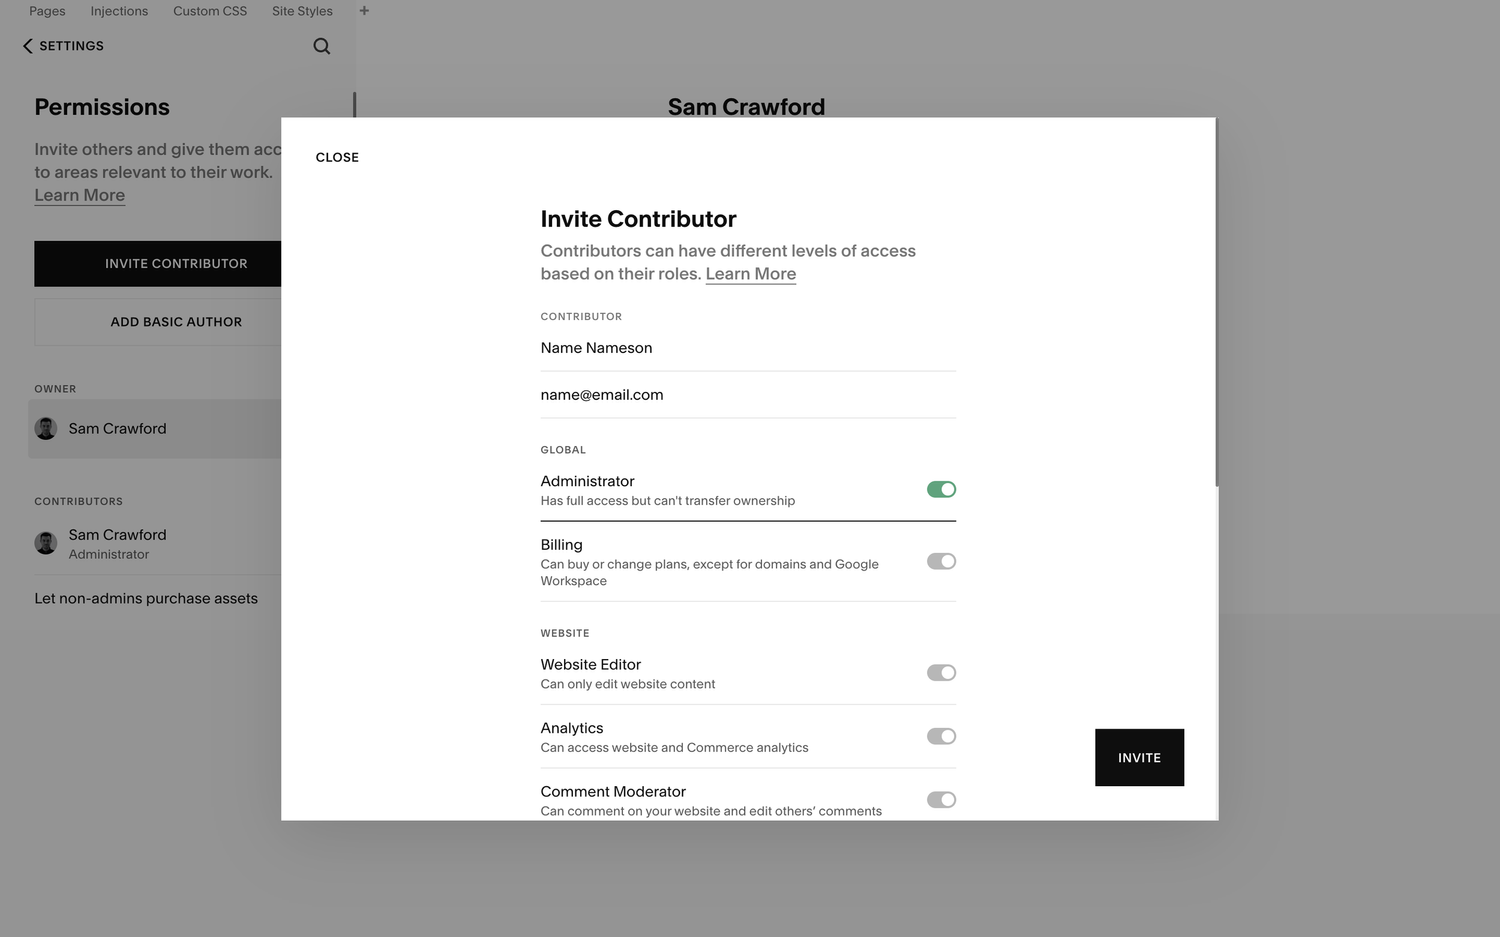
Step 3:
Click “Invite,” and the new owner will receive an invite via email from Squarespace asking them to accept the invitation. As soon as they accept the invitation, they’ll be added as a site contributor.
Step 4:
Once they’re added as a contributor, you then need to transfer the ownership of the website to them. To do so make sure you’re logged into the account that currently owns the website and select your profile in the list of site owners. Click “Transfer ownership,” select from the list of website contributors to whom you want to transfer ownership, click “Continue,” and then “Confirm.”


And that’s it. Once you’ve done that, you’ll have transferred the site ownership over to the new owner.
To remove yourself from the website once the transfer is complete, head to your main Squarespace dashboard, and in the website listing, click the three dots and select “Remove me” from the dropdown menu.
There you have it — you now know how to easily perform a Squarespace ownership transfer. See, I told you it was simple once you know how! However, given most people do a website ownership transfer at the eleventh hour, it’s easy to overlook security measures; continue reading for some security tips to adhere to before you transfer Squarespace ownership.
8 Important Security Measures to Take During Transfer
Transferring ownership of a digital property, like a website, requires some prudence. To avoid future complications, you need to implement stringent security measures during a transfer.
Here’s how to keep everything locked down:
Use strong passwords: Before you even think about starting the transfer, both parties should update their passwords to strong, unique combinations that haven’t been used elsewhere. Password managers can help generate and store these securely. This is especially important for the admin accounts that have full control over the website.
Enable two-factor authentication (2FA): Both the current site owner and the new owner should enable 2FA on their accounts. This adds an extra layer of protection, ensuring that even if a password were to fall into the wrong hands, there’s an additional security checkpoint.
Limit access during transfer: During the actual transfer process, limit the number of people who have admin access to the site. The fewer people with access, the lesser the chance of a security breach.
Use secure transfer methods: When handing over sensitive information like passwords or access keys, use encrypted methods of communication. Avoid email if possible, and instead use services like Signal or encrypted email providers.
Maintain an audit trail: Keep a record of all the steps taken during the transfer, including communications and changes in access. Should anything go awry, this will help you trace back and understand what happened.
Ensure immediate access review post-transfer: As soon as the transfer is complete, the new owner should review all access points to the website. This includes updating passwords again (yes, again!), reviewing account recovery methods, and ensuring that no old accounts or permissions remain that could allow a previous owner and contributors to access the site.
Ensure legal documentation: Be sure that all aspects of the transfer are documented within a legal framework. This could include a bill of sale or an official transfer agreement, which outlines the responsibilities of each party in protecting the website during and after the transfer.
Notify your hosting and domain providers: Let your hosting and domain registration providers know about the change in ownership. They may have their own procedures to follow to help secure the transfer.
By following these security best practices, both parties can rest assured that the Squarespace ownership transfer process is not only smooth but also secure. It’s about protecting your digital asset at every step of the way!
Frequently Asked Questions
Can I transfer a Squarespace site to someone else?
Yes, you can change site ownership on Squarespace. Simply access the “Permissions & Ownership” panel, select the current owner’s name, choose “Transfer Ownership,” verify your account, and then select the new owner from the provided drop-down menu to complete the process.
Can I transfer my Squarespace website to another host?
Yes, you can transfer your Squarespace website to another host. You’ll need to export your site as a .html file and be aware that only certain content types will be transferable. The process may require additional steps depending on the new host’s requirements.
Can I transfer my Squarespace domain to Shopify?
Yes, you can transfer your Squarespace domain name to Shopify. To do so from domain management, unlock the domain by unchecking “Lock Domain” and click “Send Transfer Authentication Code” to receive an email with a unique code. Use this code to initiate the Squarespace domain transfer process to Shopify.
What is the difference between owner and admin in Squarespace?
A Squarespace site owner has full control over content and settings, including the ability to transfer ownership. Administrators have nearly identical capabilities but cannot change the site’s ownership, a privilege reserved exclusively for the owner.
Conclusion
The Squarespace ownership transfer process is not as complicated as it sounds. Simply follow the procedure I outlined in this guide, and ensure you take adequate preparation and security measures before and after the transfer. In no time, you will be done and more confident if you ever need to repeat the process. Remember, I am only a message away if you need any assistance with your Squarespace website design.

Need an expert to build your Squarespace website?
Book a free kick-off call with our team to discuss your project requirements in detail.